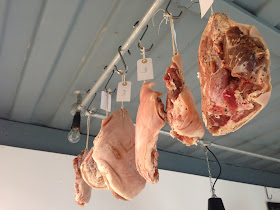
I had the best carbonara the other week. It was a Sunday night, and everyone was feeling a bit tired and down, comfort was required, carbonara was required... and even better with homemade Guanciale, which sounds a bit smug, but isn't actually that difficult to make, as long as you are patient... I started a few months ago, it hasn't required much effort, and now I have lots of cured pigs cheeks to play with...
I keep saying I will experiment with more curing of meat, prior to this I have only tried different types of salami, but the success of these little cheeks has spurred me on to try more. I'd really like to have my own pastrami and bresaola in Cook House, as well as salami and other bits and bobs, a Cook House charcuterie board is the aim at some point, I'd better get on with it...
I ordered 6 pigs cheeks from Charlotte and they arrived the next day. They are quite big, something everyone seems to comment on, but I guess pigs have big heads. That one in the Ouseburn farm, Babooshka, is a monster...
I followed a recipe from one of the River Cottage handbooks about curing and smoking. I free styled with a different cure, I wanted something with bay and sugar in it, rather than just a straightforward salt cure. So I used equal quantities of salt and light brown sugar, 90g of each, added torn up bay leaves, some cracked black peppercorns and some crushed juniper berries.
You need to remove any hairs from the pigs cheeks, either with a sharp knife or a blow torch. I haven't graduated to blow torch ownership yet... There might be grey pappy glands still attached to the cheeks, so get rid of these.
Then simply mix up the ingredients for the cure. I put the cheeks in a big tupperware and added everything, if you are only doing a couple it is good to use a freezer bag. Distribute the cure mix evenly so it covers all of the meat, squeeze out as much air as possible and seal. Then place in the fridge. I cured mine for 2 weeks as I was doing so many. They say 3 days per 500g, but the longer you cure them the more flavour gets in. Turn them over every few days so that the cure distributes around evenly, it will become liquid as time passes.
When they have finished curing remove them and give them a wash under cold running water, then dry them thoroughly with kitchen roll. I then gave them a little dusting of extra cracked black pepper. You can tell that a lot of the water in the meat has come out during the cure, as they are a much firmer thing than two weeks previous.
Finally I made a hole in the top of each cheek and strung them up. They need to be somewhere with airflow, out of direct sun light, not to hot or cold, a bit humid... But obviously you can only work with what you have. At cook house I hung them near the back door, at home I use the top of the porch. Then wait... I wrapped them in little muslin bags after the initial few days of drying as I didn't want flies landing on them.
They will take 3-5 weeks, keep weighing them to check, but they are ready when they have lost 30% of their weight and they smell really meaty.
I've had one down off the hook so far, the smallest one. It's delicious as a cured meat, just sliced really thin. Diced up and fried it really crisps up and is delicious in pasta or on top of a risotto. You can taste that it was a sweet cure, which I really like, there are hints of the bay and the juniper too, it's a much more fragrant cured meat than I am used to, which is very pleasant. It is also really very meaty, it smells powerfully of cured pork, but that's how I like my kitchen to smell of an evening if I'm honest... The skin has turned into a coat of steel however, cutting through it is a right pain, I need to invest in a proper meat slicer before I take my hand off trying to saw through it! It's a cross I'm willing to bear just now though...


