Links

Tuesday 29 November 2016

Pigeon Prosciutto

I want my game to taste of game, I like it hung and full of strong gamey flavour, it's one of the highlights of Autumn for me. These little pigeon breasts do not disappoint in that respect and are full of flavour. The Feathers Inn had too many to deal with so sent some my way, I think about 20, and I wanted to do something a bit different with them.


I've read about duck ham, although not yet tried it out, so did a bit of reading around the subject. I couldn't find anything about any cured pigeon but thought I'd give it a go anyway. I liked the idea of some cured gamey meat with pickled pears and walnuts, it was ticking a lot of autumnal boxes in my head...

Pigeons are pretty easy to pluck, the feathers come out pretty easily and don't generally tear the skin, it becomes harder work the bigger the bird and how presentable you want them to look at the end. I quite enjoy it, it can be quite messy so recently I've been wrapping up warm and setting up outside with a table and a bin bag, utilising the wind to clear up all the stray feathers, rather than intensive hoovering.

If you're giving this a go starting with a feathered friend, gently pull out all the feathers covering the breast, using your thumb and forefinger. Remove all the feathers from the neck, on the shoulders, down under the wings, over the breast and down to its bum... If you were going to roast it whole you would need to continue to pluck the whole bird, remove the head, wings and legs and then gut it, but that's another story and actually quite easy once you've done it a few times.


Once all the breast feathers are removed take a very sharp knife and make an incision down the centre of the skin along the breast bone, then pull the skin back from the meat to reveal the whole pigeon breast. Then pick a side and keep your knife as close to the bone all the way along from neck to bottom, gently running the length of the bird to remove the breast in one piece with as much meat as possible, aiming to leave little or none behind on the carcass. Repeat on the other side. Then there you have it, a butchered pigeon, you will improve the more you do it, I found doing 20 odd quite satisfying and was pretty proud of my efforts by the end.


I used a cure of 3 parts fine salt and 1 part sugar as I wanted a slight sweetness to it. I added some black pepper, torn up bay leaves, some rosemary and some crushed juniper berries. Sprinkle half of the mix over the bottom of a flat container that will fit all your pigeon breasts, then cover everything with the other half of the cure.

I wasn't sure how long to leave the pigeon to achieve what I wanted, but I put them in one afternoon and checked them the next morning and they were done. I had imagined 2 or 3 days but it was much quicker. The cure had turned to liquid, in turn drawing the liquid out of the meat, the meat had become harder and more solid over night. Remove the pigeon and rinse under cold water, then dry them off with some kitchen roll. I left them out to dry in the air for a few hours, but they are ready to eat straight away. They are rich and gamey, delicious, with a salty hit. I was really pleased with them.


After eating a whole one straight off and patting myself on the back a bit I wondered what to do with them. Curing something always feels a bit like magic to me, you've created something quite complex by doing something quite simple, I always feel a great sense of achievement! I put these guys into a salad that was delicious with bitter radicchio, sweet pickled pears, toasted walnuts and the salty rich irony pigeon, it worked really well.


Tuesday 18 October 2016

Goat Mince Ragu

All through October chefs and restaurants all over the country were taking part in something called 'Goatober'. I've got to say, it's not the catchiest of titles, but you get the jist, goats and October being the important bits.

Goatober is the brainchild of Heritage Radio Network Executive Director, Erin Fairbanks, and renowned New York cheesemonger, Anne Saxelby. An annual campaign every year in October in the US. In 2010, Heritage Foods USA partnered with a dozen goat dairies around upstate New York and Vermont to purchase their unwanted males, who, as unable to produce milk for dairy products, are killed at birth. Over 50 New York City chefs agreed to feature goat on their menu for the full month of October including Gramercy Tavern, Babbo, Spotted Pig and Bar Boulud and the campaign’s success has continued to grow to year on year.


This year James Whetlor of Cabrito, a relatively new company bringing British goat into the mainstream food market, has been championing the event over here in the UK. I decided to get involved as I really do like goat and was keen to support James, and also my local goat suppliers The Goat Company based up in Morpeth.

This Goat Mince Ragu recipe has been on the menu at Cook House all month, I'm serving in on toast smothered in delicious Doddington cheese. It is also great served with pasta, in a lasagne or with some buttery polenta.

To start finely dice 1 onion, 1 carrot and 1 stick of celery, then add to a big pan with a pinch of salt, a bay leaf, 3 tablespoons of olive oil and 15g butter and cook slowly until soft and turning golden, for about 15 minutes. 


While this is going on add 4 large tomatoes cut into quarters, or the equivalent amount of cherry tomatoes to a small baking tray with a couple of cloves of garlic, add a splash of olive oil, and a pinch each of salt, pepper and sugar. Then roast at 200˚C for about 20 minutes, until soft and starting to brown. Then remove from the oven.


Grate into the onion mix, one clove of garlic and a few sprigs of finely chopped thyme and stir through. Add 1kg of goat mince, this will serve 4 generously. Gently stir the goat mince on the heat until it is browned and breaks up evenly. Then add 2 heaped desert spoons of plain flour and stir through, allow this to cook for 5 minutes. Then add 2 heaped desert spoons of tomato puree and stir through and allow to cook for another 5 minutes.


Add the roast tomatoes to a blender and blitz until totally smooth and then stir this into the goat mince, post flour and tomato puree. Add a big pinch of salt, lots of ground black pepper and a teaspoon of sugar and stir to combine. It will begin to smell and taste delicious at this stage. You're looking to layer as much flavour into the pan as possible, the golden veg at the beginning and then these delicious roast tomatoes all help that along.

Then add about 600ml of beef stock and a teaspoon of Worcestershire sauce; preferably homemade stock made with roast beef bones simmered for a few hours with stock veg, which will yield the most delicious results. Then let the mince simmer for an hour, covered, very gently, so it's just moving. If it seems too thick add a little more stock. After an hour remove the lid and if it seems like there is a bit too much liquid, take the lid of and turn the heat up and let it reduce for about 15 minutes, stirring now and again so it doesn't stick to the bottom. Turn it off when it is the desired consistency, check the seasoning and let it sit for 15 minutes, just to let let it settle and for all the flavour to come out. It is even better the next day, so if you can make it ahead that is ideal...

To serve, pop it on toast with lots of grated cheese, or stir through some pasta, again top with cheese, or layer it up into a homemade lasagne, making sure to top with cheese!


Wednesday 21 September 2016

Pit Cooking - Lamb in the Ground

I have wanted to experiment with cooking something in a pit in the ground for a long time; a lamb or a pig, out in the wild... surrounded by nature, digging up beautifully cooked meat, grilling lovely vegetables on the fire... I watch Francis Mallman on 'Chef's Table' with envy, and make plans to light fires, cook whole venison and river trout at the top of a deserted valley with friends and family one summer. I'll send out invitations with just a little map; everyone will walk for miles to the delight at the end, maybe no one will want to come, but I will! However, if I'm ever going to actually attempt that I needed to practice; because that's not just going to fly on the first attempt!


So a few weeks ago we set off to the lakes with a big leg of lamb and a vague plan. I read various websites and put together an idea of what I might do. In short, dig a hole in the ground, fill it with stones, burn a fire until the stones are red hot, put the lamb in, cover with soil and turf and hope for the best...

I settled on a cooking time of 12 hours, various times were mentioned on line but this allowed us to leave it in all night, get it out in the morning, and have time to rescue it if needs be before guests arrived for lunch. So we had to forgo the 'big reveal' of digging it out of the ground to the waiting crowd, but it seemed like the sensible thing to do as I had read reports of joints being burnt on the bottom and raw on top and various other disasters...


The hole in the ground needs to be deep enough to accommodate a layer of large stones at the bottom, the lamb in the middle, more stones on top and then a layer of soil and turf, so we ended up with a pit about half a metre deep, measuring about the same in width and length.

We collected stones from the river, going for pretty large ones, as they need to retain the heat for a long time, about the size of your head I read, I chose slightly smaller ones as I had to carry them! The idea is to heat them as hot as possible, burning a fire around them for a good few hours, letting your fire eventually disappear , leaving you with stones that are about 200/300 degrees.


We lined the bottom and the edges of the pit with the stones, then placed a few more in the middle that we ear marked as the ones that we would then lift up and put on top of the lamb when it went in. Then covered the whole lot with kindling and logs and got going with the bonfire, gradually adding more logs as it burnt bigger, building it up to heat all of the stones. I think we burned it for about 3 hours in the end. It was very enjoyable sat round faffing about with the fire, a glass of wine in hand, excited to put the lamb in and wondering what on earth was going to happen.
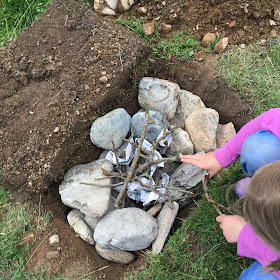


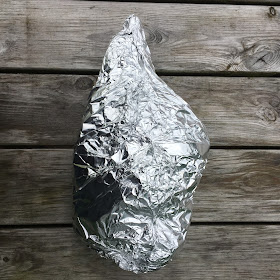
I marinated the leg of lamb in garlic, rosemary, lovage, olive oil, lemon juice, salt and pepper and left it out to come up to room temperature while we got the fire going. Before it goes in it needs to be wrapped up very tightly in foil, do this carefully as you don't want all the lovely juices to leak out, I used quite a few layers. Then wrap it in an old damp towel or a damp burlap sack. This creates a barrier between the lamb and the red hot stones and prevents burnt spots.



The fire burnt and burnt, we moved the logs around so every stone was enveloped with heat and slowly we let it burn right down, pushing the embers away into the gaps between the stones, until it had all but disappeared and we were left with red hot stones. It took about 3 hours in the end; it is worth taking your time over this bit as if the stones haven't heated right to the core they aren't going to be very good at cooking your lamb for 12 hours. Obviously this is a difficult thing to assess, testing the middle of stones, but I figured a long, long fire was the answer. 


Then the parcel of lamb is placed in the middle. We had big fire proof gloves to lift out some of the stones, put the lamb in place then put some stones back over the top, so all surfaces were covered. It was starting to get dark at this point and the heat was so intense, it was a bit of a frantic getting everything into place... Then dig the soil back over the top, covering the whole thing so no little jets of steam and smoke are escaping, finally placing the square of turf back over the whole thing and stamping it down, you shouldn't be able to feel any heat coming out at all. Almost as if nothing had happened.
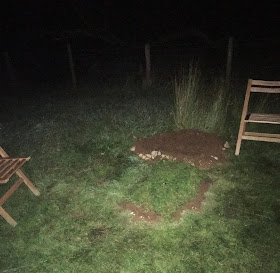

Night had begun to fall and we were shoveling soil back into the pit by the light of an iphone, anyone passing may have thought we resembled a scene from Midsummer Murders... It was all very exciting to see what we would find in the morning!

It was a really cold night and there was a icy dew covering everything when I went outside at about 9am and you could see your breath. I could see patches of dry soil and around the edge of the turf top, and the ground felt warm when you put your hand to it... joy! it had actually stayed warm overnight, so something must have happened... We carefully lifted the turf lid then began to dig away the soil, slowly uncovering the lamb bundle. It was a warm bundle when lifted out, and unwrapped the lamb was actually cooked! Lovely smells wafted out as I unwrapped it, finding soft, cooked, aromatic lamb, actually cooked!


It was pretty anaemic looking, it doesn't colour at all as it is basically steaming in its little bundle, so there's no great 'wow, look at that transformation' moment, it's just cooked. But it felt pretty good that we'd managed to actually cook it with just some stones and a fire. For lunch I put it in the oven to heat through and crisp up, it was very tasty sat at the long table next to the pit with the carved up lamb, big salads, bbq potatoes and vegetables, a smoky aubergine yoghurt, mint syrup, spicy tomato sauce and everyone tucking in.


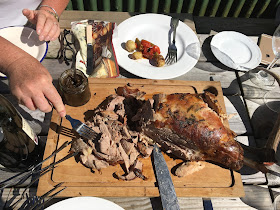


I'm keen to try it again as soon as possible. There are some things I would like to improve on. When we took it out of the ground it was warm, but not hot, and would have needed a blast of heat from an oven or bbq regardless, so I think I left it in a bit too long, or, the stones could have been hotter to start. The lamb doesn't fall apart as it would in an oven braise, you had to carve it into slices, and I think perhaps it didn't reach a high enough temperature for long enough, so again, perhaps heating the stones better at the beginning might improve this. That said it was a pretty satisfying day all round! I'll report back on take two...


Tuesday 16 August 2016

Drinking Vinegar's or 'Shrubs'

I've come across drinking vinegars or 'shrubs' as they are known in a few places over the years, I think the first time was in Ducksoup in Soho, but I chose wine instead... They sparked my interest but I hadn't actually ever tried them, and added them to a long list of 'things to try out'.

I'm a fan of the sour, the pickle, anything sharp, whether it is in food or drinks, a sour beer or a sour cocktail, always gets my attention... I'll order food based on the presence of a caper sometimes, those little bursts of something sharp with a rich meat or a buttery sauce is the best balance in my mind. Fergus Henderson gives warning however; as much as you think you love the caper, don't overdo it - they should be discovered like a prize, the 'Ho! Ha! moment of surprise and delight' he calls it...


Making a shrub is similar to pickling, an old fashioned way of preserving fruit. Fruit mixed with vinegar then made into a syrup. I have seen it done the other way round where the fruit is macerated with sugar first, then mixed with vinegar, but I prefer the former. You have more control over the sweetness that way, and a more versatile product because the fruit vinegar is a delicious thing in its own right that can be used in salad dressings, braises and sauces, to name but a few...

The drink itself is great just with soda, a sharp drinking cordial. It seems odd to be drinking vinegar, but it's just a sharp kick the same as you would get from using citrus in a good punchy lemonade. It is also double great in a cocktail, I made a cherry shrub, elderflower cordial and gin fizz recently that was a summery gin delight!


Cherry was my first shrub experiment. I had a beautiful big box full and wasn't sure what to do with them all, I pickled some first off, these are really good with cheese or pates. Then set to making my first shrub. The good thing is that you can use fruit that's a bit on the turn too, so if something looks like it's a bit overripe or you're not going to use it up, just put it in a shrub...


Wash whatever fruit you are going to use. I stoned a load of big fat cherries, about half a big kilner jar full. Just tear them in half into a bowl, then mash them up either with your hands or a potato masher, crushing the flesh and getting all the juices moving. Add them to your jar and you want to add the same quantity of vinegar to fruit, roughly. I don't think you need to be super accurate with any of this. I used white wine vinegar this time round. Seal the jar and give it a good shake. Then leave for 1 to 2 weeks, giving it a shake every few days, you want the maximum amount of fruit flavour to come out as possible.


Then it is time to strain it and add sugar. You can strain it through a muslin cloth or through a sieve, it is fine if a bit of pulp stays in the mix, it's just down to preference. Then add sugar to taste. I have been adding about half as much sugar to liquid, some recipes say equal amounts, but I found this far too sweet, I want to taste the fruit, not just sugar. So if you have about a litre of fruit vinegar add about 500ml of caster sugar. You don't need any heat, just stir until it is dissolved. Then it is ready to use.

I have been using about 1 part shrub to 5 parts soda or water, or gin... But it is down to personal taste really. I would like to make some with some unpasteurised vinegar, this is a live fermentation and so full of probiotics and very good for you.


Since using the cherries I have also made a gooseberry shrub, with lovely fat gooseberries from the Ouseburn Farm. I also tried a Strawberry, Raspberry and Black Pepper one too, which is delicious with a warm spice from the pepper. Long before I started thinking about shrubs I also put some new pine shoots in to vinegar to flavour the vinegar, not thinking that it was the beginning of a drinking vinegar, I tried it recently and it'd delicious, but I'm aiming to leave the pine for at least 6 months as that was the original plan. Larger harder fruits or leaves can either be left much longer to break down, or there is a method of cooking them slightly first with spices, water and sugar, then adding vinegar. I'll give this method a go too and see which I prefer; regardless I'm a total drinking vinegar convert now, hope you feel the same...

Wednesday 29 June 2016

BBQ Bavette and friends

I'm trying to expand my cooking on fire repertoire; so I took the opportunity to try a few new things recently, on a short break in the Lake District. Fire makes me a bit more apprehensive than the safety of an oven, but it also allows you to be outdoors, and is a lot more exciting... I'd always be outdoors if I could choose... if only the weather was a bit better...


I've been watching the new series of Chef's Table on Netflix, I love it, one of my favourite episodes is from the first series about Francis Mallman, he has a restaurant in Argentina that focuses on Patagonian cuisine. When he's not there he seems to wander the country cooking outdoors in the most remote and beautiful spots. At one point Francis and his team are out in the snow on the edge of the forest, they had dug a fire pit that morning and set up whole lambs cantilevered over it, cooking all day. They set up a full table, rugs, furs, chairs, giant bottles of red wine; and laughed and feasted in the snow, it looked perfect. He has a small fishing boat, that has a little BBQ attached to the side of it so he can float around on the beautiful lakes of Argentina, catching fish, putting them straight on the coals, relaxing in the boat, drinking red wine. So that's where I'd like to get to, set ups like these one day... out in the quiet, fresh air, water, nature, fire, cooking and wine, that's my idea of a good life...

But for now I've just got a small BBQ, and I'm thinking about where to dig the fire pit... but there's always the future. It's not all about huge chunks of meat either, so let's start very small... with BBQ pea pods.


Peas are in season right now, so get some fresh peas in their pods. You can put them on very early while you're still waiting for the coals to all turn white, when it's still a bit too hot for the meat. Lay out a layer of pea pods over the grill, turning them around now and again, until you get a good char on the outside, then take them all off into a big bowl. The peas will have steamed cooked inside their pods. Sprinkle with lots of salt and suck the peas out of their pods, a lovely snack while you wait.


BBQ New Potato Skewers are a good new discovery I've found. Par boil your new potatoes, about 3 per skewer, depending on how big they are. They should be almost done. Drain then, leave them to dry in their own steam, then toss them in olive oil and salt. Thread 3 or 4 onto wooden skewers and place them on the BBQ, leave them for a minute on one side, then turn, a minute on the other, depending how hot your fire is, they should take on a deep golden skin. Take them off when they are ready and serve with lots of cold butter or a really good aioli.


Then to the BBQ Bavette Steak. I used a 2kg piece of bavette, which is also known as the flank steak. This was for 6-8 people and was plenty. It is marinated, cooked quite quickly so it stays pretty rare then sliced thinly. Make the marinade first, some olive oil, a splash of sesame oil, a couple of centimetres of grated ginger, a clove of grated garlic, a splash of soy sauce, a teaspoon of sugar, salt and pepper. Mix it up and taste, alter to suit, more salt, more sweet, however you like it. Then cover the steak in it and leave at room temperature for an hour or so, or you can leave it in the fridge over night.

When the BBQ is hot, all the coals white and the flames have died down it is ready. Put the steak on and leave it, don't touch, give it 4 minutes on the first side, don't move it, this allows a crust to form, then turn, for another 4 minutes, but it can vary, so prod it with your finger, if it feels very soft it's still very rare, you want it when it just starts to firm up, like the bit of your palm feels next to your thumb when you prod it... Remember don't move it around, just two turns... Then get it off when you think it's done and rest it for 5 minutes, covered. This allows it to relax, keep its moisture and generally get over the aggression of the fire it's just been on... Get a sharp knife and slice thinly to serve, about half a centimetre ish... It should be beautifully pink inside and totally delicious...

Everything is a bit ish when it comes to cooking on fire, just try and practice and find your way, I'm starting to...