I had the best carbonara the other week. It was a Sunday night, and everyone was feeling a bit tired and down, comfort was required, carbonara was required... and even better with homemade Guanciale, which sounds a bit smug, but isn't actually that difficult to make, as long as you are patient... I started a few months ago, it hasn't required much effort, and now I have lots of cured pigs cheeks to play with...
I keep saying I will experiment with more curing of meat, prior to this I have only tried different types of salami, but the success of these little cheeks has spurred me on to try more. I'd really like to have my own pastrami and bresaola in Cook House, as well as salami and other bits and bobs, a Cook House charcuterie board is the aim at some point, I'd better get on with it...
I ordered 6 pigs cheeks from Charlotte and they arrived the next day. They are quite big, something everyone seems to comment on, but I guess pigs have big heads. That one in the Ouseburn farm, Babooshka, is a monster...
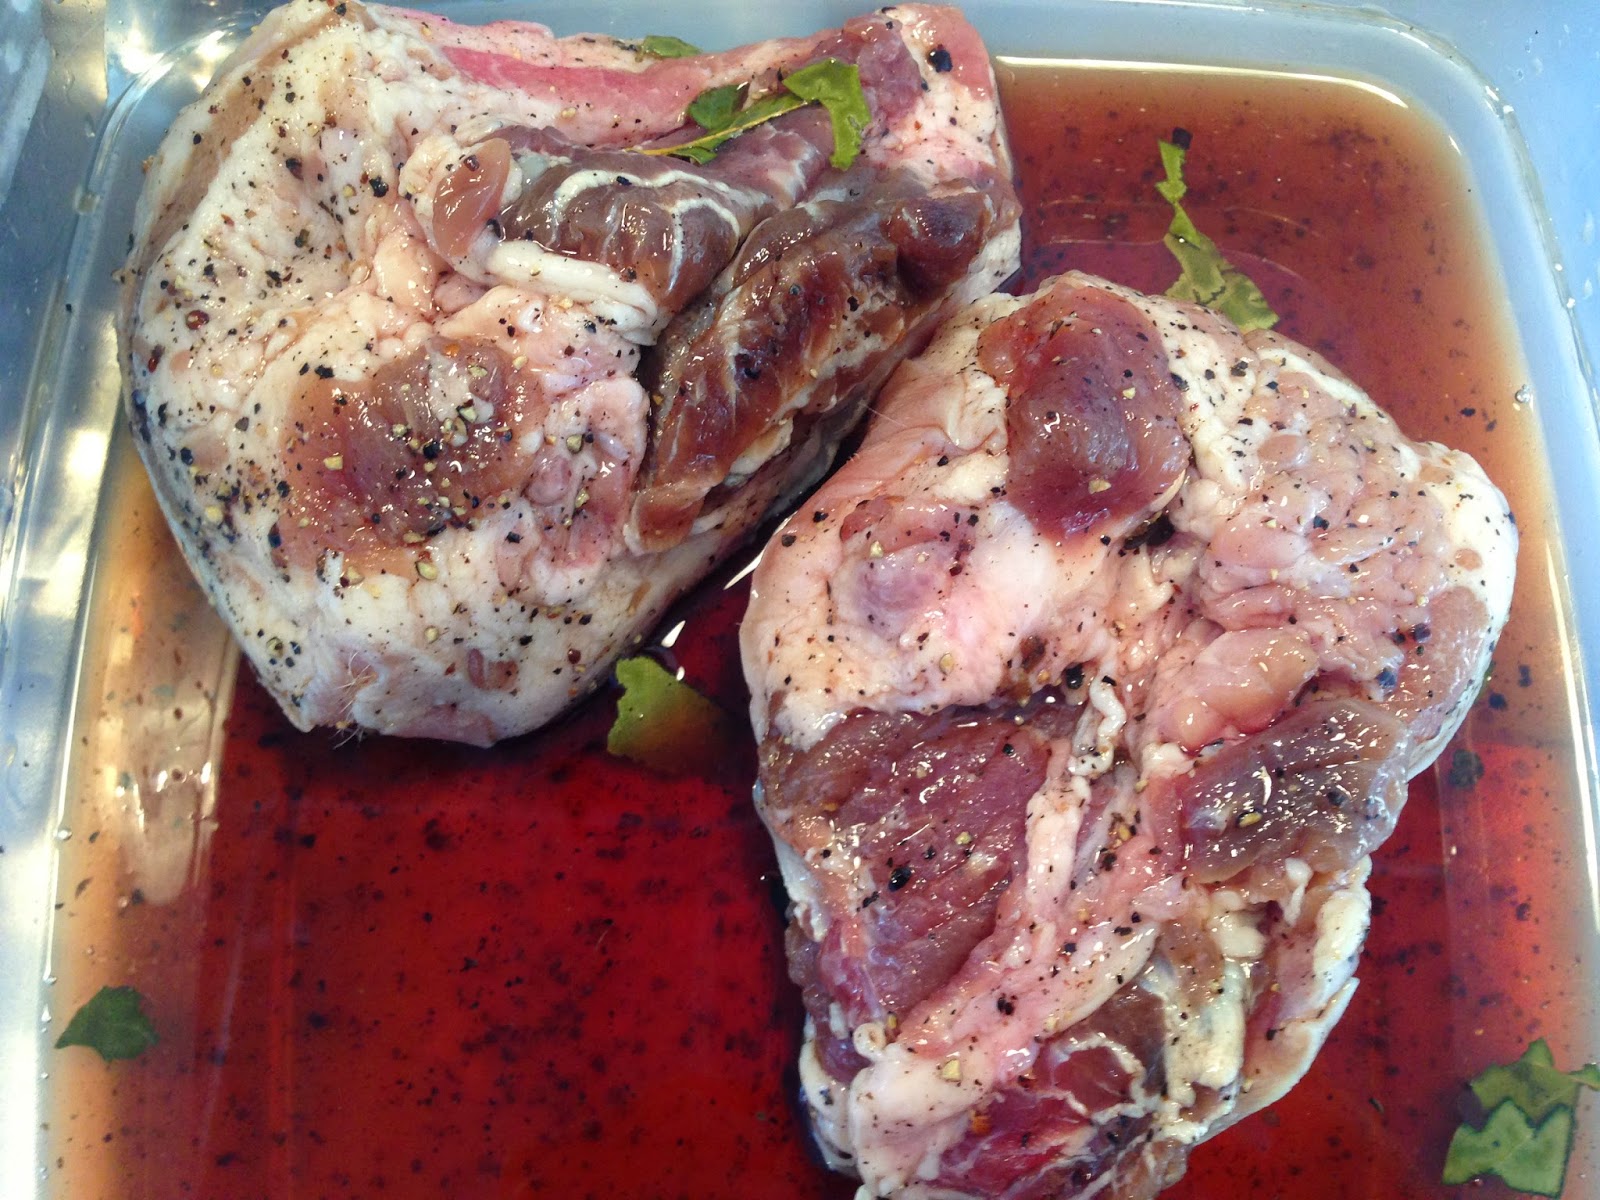
I followed a recipe from one of the River Cottage handbooks about curing and smoking. I free styled with a different cure, I wanted something with bay and sugar in it, rather than just a straightforward salt cure. So I used equal quantities of salt and light brown sugar, 90g of each, added torn up bay leaves, some cracked black peppercorns and some crushed juniper berries.
You need to remove any hairs from the pigs cheeks, either with a sharp knife or a blow torch. I haven't graduated to blow torch ownership yet... There might be grey pappy glands still attached to the cheeks, so get rid of these.
Then simply mix up the ingredients for the cure. I put the cheeks in a big tupperware and added everything, if you are only doing a couple it is good to use a freezer bag. Distribute the cure mix evenly so it covers all of the meat, squeeze out as much air as possible and seal. Then place in the fridge. I cured mine for 2 weeks as I was doing so many. They say 3 days per 500g, but the longer you cure them the more flavour gets in. Turn them over every few days so that the cure distributes around evenly, it will become liquid as time passes.
When they have finished curing remove them and give them a wash under cold running water, then dry them thoroughly with kitchen roll. I then gave them a little dusting of extra cracked black pepper. You can tell that a lot of the water in the meat has come out during the cure, as they are a much firmer thing than two weeks previous.
Finally I made a hole in the top of each cheek and strung them up. They need to be somewhere with airflow, out of direct sun light, not to hot or cold, a bit humid... But obviously you can only work with what you have. At cook house I hung them near the back door, at home I use the top of the porch. Then wait... I wrapped them in little muslin bags after the initial few days of drying as I didn't want flies landing on them.
They will take 3-5 weeks, keep weighing them to check, but they are ready when they have lost 30% of their weight and they smell really meaty.
I've had one down off the hook so far, the smallest one. It's delicious as a cured meat, just sliced really thin. Diced up and fried it really crisps up and is delicious in pasta or on top of a risotto. You can taste that it was a sweet cure, which I really like, there are hints of the bay and the juniper too, it's a much more fragrant cured meat than I am used to, which is very pleasant. It is also really very meaty, it smells powerfully of cured pork, but that's how I like my kitchen to smell of an evening if I'm honest... The skin has turned into a coat of steel however, cutting through it is a right pain, I need to invest in a proper meat slicer before I take my hand off trying to saw through it! It's a cross I'm willing to bear just now though...
Showing posts with label Pork. Show all posts
Sunday, 26 April 2015
Saturday, 13 October 2012
Smoked Baby Back Ribs
Mr Smokerson was
feeling a bit neglected I think, starved of attention for at least a
few weeks, maybe longer... Poor guy. Until I spotted some baby back
ribs in Waitrose that was. I've smoked some once before and it was an
effort to find them; now I see them everywhere, Morrisons, Waitrose,
The Grainger Market. They are small, tasty and cheap. This lot only
cost £2 and there were smaller racks for less... rude not to I
thought...
It was a match day,
expectations were high... (not that high as we were playing Man
United), but high enough to bet on Newcastle to win and get up early
to light the smoker and pop some ribs in. The sun was shining,
autumnal colours were dancing around the yarden, wood smoke was
puffing out of Mr. Smokerson, I could smell smoky delicious ribs, I
was happy, Mr. Smokerson was happy, everyone was happy...
That was until about 4
minutes into the match, but the less said about that the better, I
still smelt a bit of wood smoke and hadn’t forgotten the good times
entirely...
You don't necessarily
need a smoker to make these as there are two methods, one for the
smoker and one for the oven. I haven’t tried the oven method yet,
but the smoker way is pretty damn good, so I'm guessing that is too.
The recipe is from the Joe Beef book, my current obsession and
inspiration for my Pop-up Feast on the 3rd November at Ouse Street Arts Club.
My ribs weighed about
350g. Mix together a teaspoon of smoked paprika, one of garlic
powder, one of mustard powder and one of black pepper, and add some
crushed bay leaf. Rub this mix all over the ribs, whether you are
putting them into the oven or the smoker.
For the oven method put
them in a tray, pour in half a bottle of beer and cook for 2½ hours
at 165°C
covered with foil, for the smoker method bring the smoker up
to about 240°F
and smoke for 4 hours, keeping the temperature between 210°F
and 240°F.
For me this involves lots of faffing, opening and closing of vents
and messing around with probe thermometers... but actually Mr.
Smokerson is pretty reliable kind of guy when you leave him to his
own devises, I just like faffing around pretending I'm some kind of
all American smoker guy... For a fuller explanation of how Mr.
Smokerson works see my 'Experiments in Smoking part 1' post.
We
added an overly large handful of apple wood chips at the same time as
the meat went in, and a few more half way through just for good
measure, the aim being to smoke the hell out of them. This resulted
in a pretty bloody smoky rib; soft, sweet, delicious. Just all round
delicious. Next time I'll make more as well as coleslaw, buns, bbq
sauce... I want more already...
Sunday, 20 May 2012
Pulled Pork, Polenta Chips, Baked Beans and Coleslaw
Thank
goodness the sun has reappeared, thank goodness the rain has
stopped... It has been quite depressing, rain every single day, for
weeks on end. Rain, rain and more rain. I have a broken umbrella that
makes me a bit cross every time I have to use it, I've ruined some of
my shoes and been drenched on more than one occasion. It puts you off
going anywhere or doing anything. I've been craving a holiday in the
sun, lying on a beach, swimming in the sea... But suddenly it's all
ok. The sun is out! It is warm! Today I wore ballet pumps for the
first time in weeks, we sat in the garden all day and lit the BBQ!
The weather forecast has little pictures of suns, far into the
future, it actually feels like spring, summer even, and it is such a
welcome arrival...
The
baked beans are an odd mix of ingredients, but totally delicious.
They were a recipe for some lentils in the Joe Beef book, but I
wanted baked beans, so adapted it to suit. Chop and fry some
pancetta and an onion and fry until golden and soft, then add a
minced clove of garlic. Next add half a cup of water, ¼ cup of ketchup,
2 tablespoons of maple syrup, 2 tablespoons of sunflower oil, 1
tablespoon of cider vinegar, 2 tablespoons of English mustard, 1
teaspoon of black pepper, 1 bay leaf, some salt and 2 tins of haricot
beans. Then bake in the oven at 180°C or simmer on the top
for 45 minutes, with a lid on. Check on it and stir now and again, adding a bit more water if needs be. This is all a bit out of my comfort
zone, but totally delicious.
The
creamy coleslaw was a mix of shredded white cabbage, red cabbage,
grated carrot, thinly sliced onion and some grated kohlrabi which the
kind man from North East Organic Growers gave me at Spring Graze. I
left it all to sit for an hour in a colander with a sprinkling of
salt, to get rid of the excess water. Then mixed it together with
half mayonnaise, half yoghurt, chopped parsley, a squeeze of lemon
and some whole grain mustard.
Whilst
hiding from the rain last week I have been writing about sharing food
for my column in Appetite magazine. Big or small plates in the middle
of the table whether at home or in a restaurant bring about a lovely
happy convivial sharing atmosphere. I love inviting people to my
house for food, putting plates full of tasty fare on the table and
everyone diving in...
So
in the name of research I rang some friends and decided to cook a 9
hour shoulder of pulled pork that I found in the amazing 'Joe Beef'
book. This book is definitely one of my favourite new finds, it
includes a fois gras breakfast sandwich, potted eggs with truffle and
a smorgasbord… What's not to love. The menu took a bit of time to
decide, it is a bit of a new direction, but in the end I decided on
pulled pork, baked beans, coleslaw, polenta chips and BBQ sauce...
Trashy, yet delicious...
The
main event was a 2kg shoulder joint of pork heavily smeared in English
mustard, sugar, paprika, salt and pepper, a cup of water in the bottom
of the tin and cooked at 130°C
for 9 whole hours. I like recipes that you can say in one sentence.
Put some foil over it after 5 hours and make sure it always has some liquid in the bottom of the tray... The house smelt amazing...
The
joint of meat was so soft when I took it out you could press your
finger into it and it oozed sticky lush juices. I was excited all day
to get it out of the oven! The skin was blackened and crispy but still
delicious and the meat couldn’t have been softer. A pile of soft,
sweet delicious pork falling apart with some crispy polenta chips,
creamy crunchy coleslaw and sweet smoky baked beans was just totally
delicious, a bit of tangy BBQ sauce on the side. Everyone had a
lovely time digging into big bowls of soft delicious pork, and I've
started looking into flights to Montreal, because the sooner I visit
the Joe Beef restaurant the better...
Sunday, 15 April 2012
Roast Pork Belly and Fennel Seeds served with Poor Man’s Potatoes
The allotment looks somewhere near normal, well the most normal it has looked since I got it two years ago, by normal I mean tidy, a bit tidy, in parts... because that's what everyone else's looks like, tidy, weed free, organised. Apart from the odd one, which I look at in delight when they are worse than mine.
In the past few weeks I have been making a real effort though, this is the year that I am going to get on top of it, be organised and grow loads, that's what I'm telling myself anyway. I have surfaces covered in seed trays around the house, the peas have popped up along with the broad beans, and still to emerge are sweetcorn, sweetpeas, turks turbans, green courgettes and yellow courgettes. I've planted beetroot, parsnips and poppies at the allotment and have two types of potatoes chitting on the window cill. Chitting is a technical term for sprouting shoots... I now speak horticulture... The seed potatoes came from the garden centre in Gosforth Park, Pink Fir Apples, which are delicious apparently and Duke of York’s. All this makes me sound very organised, but if you could see the thousands of weeds and huge grass chunkers taking over my plot you really wouldn’t think it...
After two hours of hard work gardening this left over roast pork belly was totally delicious, even more delicious than last night perhaps. It is a Moro recipe, Cerdo al Horno, and is the best pork I've turned out so far I think, my previous method with herbs wine and water seems a poor comparison all of a sudden. This one is roasted without any liquid for three hours with fennel seeds, garlic and lots of salt; crispy, soft, salty and delicious... Served with Poor Man’s Potatoes, Patatas a lo Pobre, slow cooked potatoes in olive oil with sweet onions, garlic and green peppers. I didn’t want it to end...
Start by bashing 1 tablespoon of fennel seeds in a pestle and mortar together with 2 cloves of garlic and a pinch of salt. Rub this all over the flesh side of your piece of pork belly, not the skin, the other side. I used a piece of pork belly from the Grainger Market that weighed about 1kg and would feed four. Turn the meat over and sprinkle the skin side with salt, lots of it. Ask the butcher to score the skin for you and rub the salt into all the slashes. Leave it to sit for half an hour and pre heat the oven to 230°C.
After half an hour brush the excess salt off and dry off any water that has come to the surface, put the pork into a roasting tin greased with olive oil and put it in the oven on a high shelf for half an hour. Make sure the oven is really hot, as this will form the hard, crispy crackling. Then turn the oven down to 180°C and cook for another 2 ½ hours. When it is done remove from the oven, transfer it to a chopping board, cover with foil and leave it to rest for 15 minutes.
In the past few weeks I have been making a real effort though, this is the year that I am going to get on top of it, be organised and grow loads, that's what I'm telling myself anyway. I have surfaces covered in seed trays around the house, the peas have popped up along with the broad beans, and still to emerge are sweetcorn, sweetpeas, turks turbans, green courgettes and yellow courgettes. I've planted beetroot, parsnips and poppies at the allotment and have two types of potatoes chitting on the window cill. Chitting is a technical term for sprouting shoots... I now speak horticulture... The seed potatoes came from the garden centre in Gosforth Park, Pink Fir Apples, which are delicious apparently and Duke of York’s. All this makes me sound very organised, but if you could see the thousands of weeds and huge grass chunkers taking over my plot you really wouldn’t think it...
After two hours of hard work gardening this left over roast pork belly was totally delicious, even more delicious than last night perhaps. It is a Moro recipe, Cerdo al Horno, and is the best pork I've turned out so far I think, my previous method with herbs wine and water seems a poor comparison all of a sudden. This one is roasted without any liquid for three hours with fennel seeds, garlic and lots of salt; crispy, soft, salty and delicious... Served with Poor Man’s Potatoes, Patatas a lo Pobre, slow cooked potatoes in olive oil with sweet onions, garlic and green peppers. I didn’t want it to end...
After half an hour brush the excess salt off and dry off any water that has come to the surface, put the pork into a roasting tin greased with olive oil and put it in the oven on a high shelf for half an hour. Make sure the oven is really hot, as this will form the hard, crispy crackling. Then turn the oven down to 180°C and cook for another 2 ½ hours. When it is done remove from the oven, transfer it to a chopping board, cover with foil and leave it to rest for 15 minutes.
I tried to make a gravy with the pan juices, Moro say to put the roasting tin on the hob, deglaze with 150ml of white wine and scrape up any sticky bits into the sauce, it looked like real gravy, it tasted of burnt bits and aluminium, you may have better luck than me...
While the pork is cooking you can make the Poor Man's Potatoes, heat 5 tablespoons of olive oil in a large pan, then slowly cook 3 large thinly sliced onions with a pinch of salt until golden and sweet, about 30 minutes. Stir them now and again so they don't catch on the bottom of the pan. After 30 minutes add 5 cloves of garlic sliced thickly, 3 green peppers roughly chopped and 4 fresh bay leaves, continue to cook for another 15 minutes. Then cut about 750g of new potatoes into wedges, salt lightly and leave for 5 minutes.
When the pepper is softened add another 10 tablespoons of olive oil, wait for it to heat up and add the potatoes and let everything simmer in the oil until the potatoes are cooked. Moro said about 20 minutes, I found it to be more like 45 minutes... Stir now and again to stop it sticking and turn it up a bit towards the end if it needs to be a bit browner and stickier... Finally drain through a sieve or colander before serving to remove the olive oil, keep the oil though as it tastes delicious for bread dipping or making crispy onions...
Serve a slice of the crackly crispy pork, which is meltingly soft in the middle and crispy, salty and crunchy on the outside with a big pile of slow cooked potatoes, peppers and garlic. They go so well together and taste even better the next day, I'm pretty glad I made far too much...
Sunday, 6 November 2011
Cassoulet
This is the first cassoulet I have ever made, and apart from the fact that it was totally delicious, it also produced meals for about three days. I love a few left overs for lunch the next day, or a meal that turns into something else, or gives you stock or fat to flavour your next meal, it feels good to reuse everything... It saves money, reduces waste and I like the idea of using every scrap possible of a duck or a piece of meat, to really put the little fellas to good purpose...
A cassoulet is a stew of sorts, a rich slow cooked French casserole, with roast or confit duck, sausages, bacon, lovely stock full of herbs and tomatoes and lots of white beans, all topped with crispy, golden baked breadcrumbs. So there was the first cassoulet evening, in all it's splendour, with rich duck and crispy breadcrumbs and a bottle of young French red wine. Then the remains travelled all the way to the Lake District to be heated through with new sausages, fresh bread for dipping and crispy green salad. Finally some came home with us again and made a lovely beany soupy lunch. A well travelled cassoulet indeed...
In the French peasant origins of the dish they used to deglaze the pot from the previous cassoulet as a base for the next one, and so on and so on, which led to stories of one original cassoulet being extended for years and years, mine just lasted a weekend... It is a dish to be made in quantity really, this will feed four or more people, just add more duck if you have more people...
I started with a pot of duck stock made from the bones of the Roast Duck with Chestnut, Chorizo and Cabbage... and with Elizabeth David... I've been carrying her book around with me lately. Sometimes to work so I can look up recipes at lunchtime, over to the Lakes to read in depth the bits I haven’t gone through before, looking for new and interesting methods and recipes. I am aware that this is not normal behaviour, constantly travelling around with recipe books... and I have had a few funny looks as people get into my car to find little book collections in the foot-well, but hey...
Start with a pan for the stock, you will need a larger pan for the whole cassoulet which will go in the oven, but start with the stock pan on the hob and heat a large splash of olive oil in it. Add two thinly sliced large onions and cook until they are soft, about ten minutes, then add some chopped smoked streaky bacon, about 6 slices cut into smaller pieces, and continue to cook until it is all golden and sticky.
Pour in the stock, I used about 500ml of duck stock, you can use chicken stock, add two tomatoes chopped into pieces, four crushed cloves of garlic, salt and pepper, some sprigs of parsley, thyme and a bay leaf and bring to a slow simmer. Leave it to simmer away for about 20 minutes. I think this is the tastiest stock I have ever made by the way... I kept on having sneaky spoonfuls all the way through...
Most cassoulet's use confit duck legs, but Elizabeth does say that to use fresh duck or goose if confit isn’t an option, which it wasn't, but it will need to be half roasted. So while the stock was simmering I put a whole duck in the oven for 10-15 minutes at 220°C. Then took it out to rest and cool enough to cut up.
You will need a big oven proof type pot for the cassoulet. Rub the inside of it all over with raw garlic to begin with. Then add about 6 good quality raw pork sausages cut in half, I also added about 4 teaspoons of duck fat from a previous roasting... You could substitute with lard or dripping... Then the duck, cut into pieces. My knives are really not very effective so we got as far as cutting it in half, it would be much better into quarters or sixths as it was really pretty difficult to eat a bowl of stew with half a duck sitting in it!
Pour two tins of drained haricot beans over the top of all of the meat and then pour the stock and all its contents over the top of everything. Bring this all to the boil on the hob and then sprinkle a few handfuls of white bread crumbs over the top. I used a stale sour dough wizzed up in the food processor until it was a fine crumb.
Then place the whole cassoulet in a low oven, about 160°C, for an hour. The stock will soak into the meat and the beans and a lovely golden crust will form over the top. Delicious... Just serve it as it is, it doesn’t need any help at all. It is rich and meaty with beautifully flavoured stock and beans, it is one of my favourite things I have cooked, really lovely... I am going to get to grips with some confit soon and make it again with confit duck legs...
I found a little tip in Elizabeth David's soup section that advised heating up the left over beans and stock and pounding them through a sieve, reheating this purée with a little milk and adding pieces of cooked sausage. It is just as good reheated in its stew form with new cooked sausages, or as a simple beans stew with crusty bread. It's just good all round really...
Sunday, 24 July 2011
Homemade Salami
I have been reading a bit about preserving, combining salts, sugars and spices to make cuts of meat or vegetables last for months or years. It comes from the days before refrigeration, and although I don't have that problem I still think it is a good way of cutting down on waste if you have too many vegetables or cuts of meat that aren’t perhaps the best. I already need to plan what to do with the millions of courgettes that have begun to appear at the allotment, and am thinking about a courgette, apple, raisin and chilli chutney. So I have been interested to see how difficult it would be to make my own salami, a homemade air dried sausage... It turns out it's not that difficult if you have the right equipment... I'm already planning bresaola and potted shrimp as my next challenge...
Start with a pork shoulder on the bone, I used rolled, but I think getting the meat sinew and fat free might be easier with a boned shoulder. My joint weighed about 1 kilogram and I ended up with about 700g of chopped meat. You also need 200g of back fat, I was told by the butchers in the Grainger Market that you can't get it, I still haven’t worked out why, but he gave me a load of fat they had trimmed from another piece of pork, it was a bit short on weight, but hopefully it will be enough. I have since been to various butchers and found it really easy to get hold of if you ask in advance.
Slice the pork shoulder into pieces, discarding all fat and sinew, and then dice it so you end up with 1cm cubed pieces of meat, or smaller. This process takes a while, my knives weren't sharp enough and it did test my patience... but I persevered and got there eventually. When the pork meat is done also dice the back fat into small cubes of a similar size.
It is now time to salt the meat. I decided to do two different types of salami so I divided my meat into two bowls, half the meat and half the fat in each. The amount of salt is critical for the curing process, so you should weigh everything very accurately. You must add at least 25g of salt to every kilogram of meat. Each of my bowls weighed 422g so I added 10.5g of salt to each, Maldon sea salt that I crushed finely in a pestle and mortar.
Now it is time for the flavouring. I decided on one quite simple combination of half a teaspoon of fennel seeds, half a teaspoon of black pepper corns and a clove of garlic, all crushed to a paste in the pestle and mortar. The other became a bit more adventurous and also perhaps more French in style, with red wine and walnuts. I added half a teaspoon of black pepper corns, a couple of crushed juniper berries, a clove of garlic, again crushed to a paste and added to the meat, along with a handful of chopped walnuts and a splash of red wine. I mixed both of the bowls up to combine the meat, salt and spices thoroughly and put them in the fridge to mingle for a few hours.
Next comes the stuffing. I ordered 38mm natural hog casings for the job, a salted pig's intestine, and soaked them overnight to remove the salt and soften them up. They come bunched up tightly on a tube ready to pull off and pipe in the sausage stuffing. They don't smell very nice I warn you... If you have a mincer they often have a sausage stuffing attachment, or you can use a small sausage funnel or pack it by hand. I did not really have the correct tools for the job, lots of frustration ensued... It took a while to get the salami packed tightly without air gaps and lumps, but I got there finally and ended up with 6 salami in total. I tied up each end with string, tying the intestine into the knot so it doesn't slip through when you hang it. I have found on further attempts that cutting a length a bit longer than you need and stuffing by hand to be the easiest method.
Each salami needs to be labelled with its full ingredients and also its weight. This is important as you will know when the salami is ready when it has lost 30% of its total weight. Hang them inside for a few days while the skins dry out and tighten up. Then hang them either outside in a cage so wildlife can't get to them, and under shelter or in a draughty porch or garage. Mine are currently up in the roof of my porch... it smells quite meaty and garlicky every time I come in and out of the house...
So that is where I am at, they will be ready in 3 weeks, and I'm already looking forward to them. They may start to develop a dry white mould on the outside of the skin, which is ok, but patches of fur or coloured mould should be washed off as they develop with a weak solution of vinegar in water. I will let you know how they taste in due course...
And finally here is the finished article... It was better than I could ever have hoped, really delicious. Rich and deep meaty flavours. When I get some better equipment I will be starting on the next batch...
Subscribe to:
Posts (Atom)